_
It's been exactly three weeks since I uploaded version 48. (https://damoang.net/keyboard/2978)
And what have I been doing for the past three weeks... I've poured all my free time into redrawing the next version from scratch. As mentioned in the previous post, the design principles and concept were already complete, but two issues arose.
One was that it still felt 'too big'. The fact that the palm rest was attached from the beginning made it very bulky. After printing one side of the bottom plate with a 3D printer, I immediately thought, 'This isn't right...' That's when I started thinking about the next version without any burden. At the same time, I needed to think more about the actual key usage ratio. In particular, the chronic problem of this keyboard design, which applied keywells to an ortholinear keyboard, was its overall height. Version 48 met the goal of being under 5cm, but it also meant giving up portability.
The second issue was some thoughts on usability. These included questions like 'Do we really need a charging interval of more than a month?' and 'If I carry it around with my laptop, what is the maximum allowable volume?' and even 'If this keyboard is inevitably expensive, shouldn't users be able to buy one and use it everywhere?'
Design change criteria.
There are some reviewers on YouTube who review split keyboards. Even though I'm pouring all my free time into making a split keyboard, realistically, my opinion can't be everything. So, I've watched all the reviews I could find. Among them, the two YouTubers I personally think are the best are:
Ben Frain (https://www.youtube.com/@benfrainuk),
if coding was natural (https://www.youtube.com/@ifcodingwerenatural)
Of course, many people talk about split keyboards, but for me, English is the language I can understand best, and these two are like me - they use split keyboards because of real pain.
Anyway, these two often talk about the portability of split keyboards in their reviews. Of course, there are models among split keyboards that maximize portability, and the demand for them is higher than for keyboards with keywells. First, without keywells, the design becomes simpler - ultimately, you can finish the design with just one PCB like a regular keyboard - so the manufacturing cost also decreases. Including these two reviewers, most split keyboard reviewers review flat or sculpted designs, but fundamentally, for people who invest in split keyboards 'out of necessity' due to pain, flat designs are not a priority.
In any case, I set the following goals:
Make it as compact as possible. The palm rest will be removed. This will require a separate battery compartment, but I will try not to increase the overall size due to the battery.
Structure the design so that it can achieve a score of 10 on the IFIXIT scale for disassembly and assembly. In this process, we will have a 'shallow' disassembly tree according to IFIXIT. Providing manuals and parts separately is possible (assuming this keyboard has commercial viability), but before that, we will modify the design to ensure at least 8 points are achievable in the design stage.
The only convenience that can be compromised in this process is the reduction in battery capacity and usage time (however, it should still be usable for a whole day on a single charge). Increasing manufacturing costs will be tolerated (within reason).
Reduce weight as much as possible while maintaining rigidity.
Considering these factors, I designed the 49th version. In fact, there is not much difference in the detailed design structure compared to version 48, but there is a big visual difference.
Design changes for version 49
The images are AI rendering images provided by SHAPR3D, the design tool. (Sometimes it messes up the design with weird imaginations)
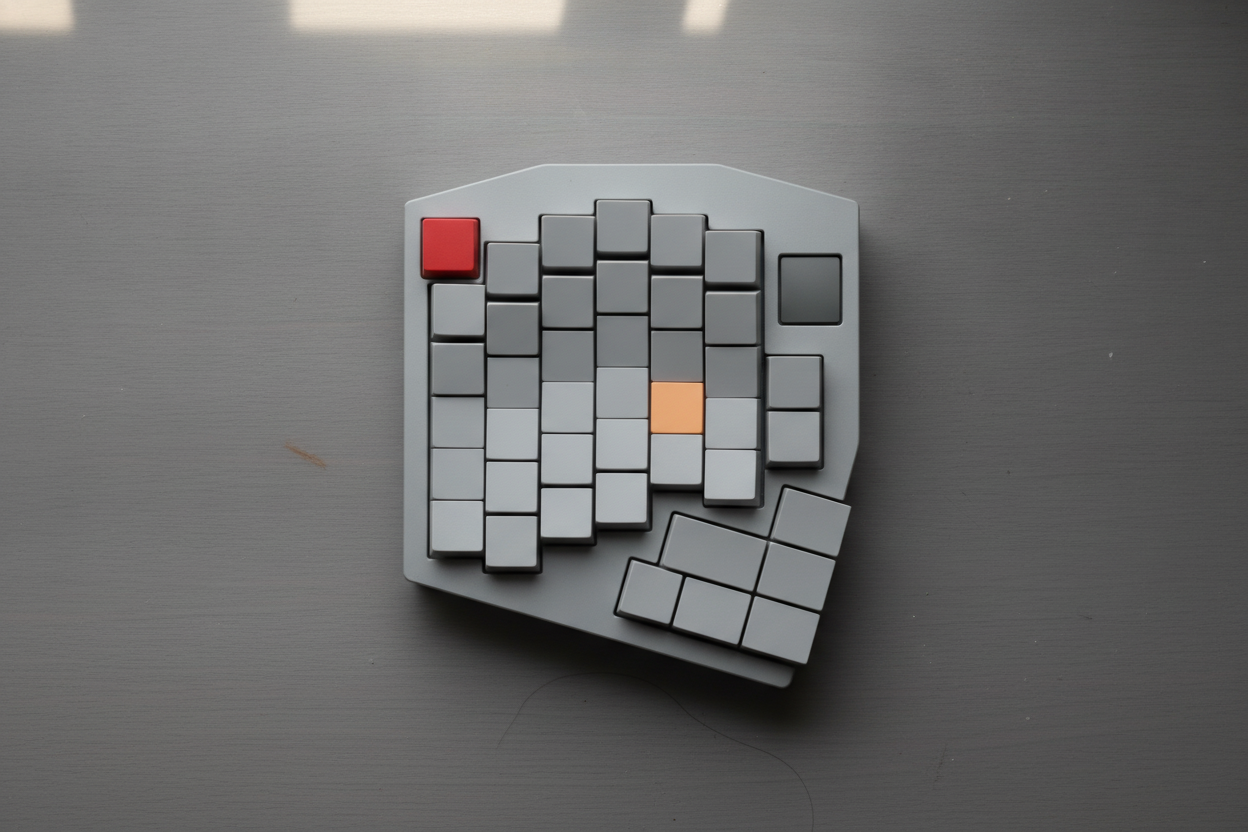
The left side of version 49. The key layout is the same as the previous version 48, but the number of thumb keys has been reduced from 3 to 2. The three buttons at the far right of the current image correspond to the thumb module.
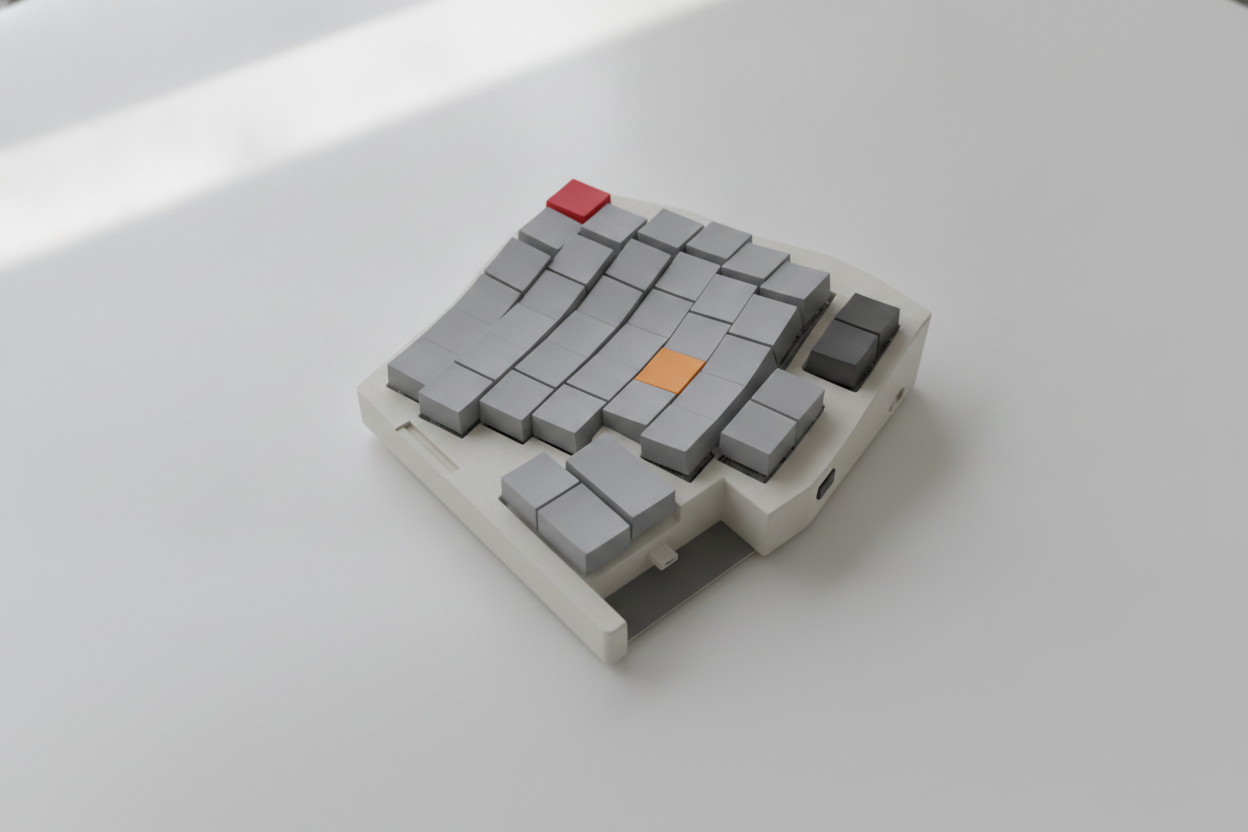
This is an image without the thumb module.
The biggest visual change is that the angle of the F column has changed. In the previous version 48, the finger's travel path followed an angle up to the number keys, resulting in a height of almost 5cm for the F column keys. The F column is necessary - of course, it's the first thing you'd want to get rid of if you wanted to reduce the number of keys - but it's not used very often. As a Mac user myself, I find it inconvenient not to have an F key, but I don't use it that often even when it is there. So, in version 49, the F key is not reachable by finger movement alone, and the height has been lowered by reversing the angle.
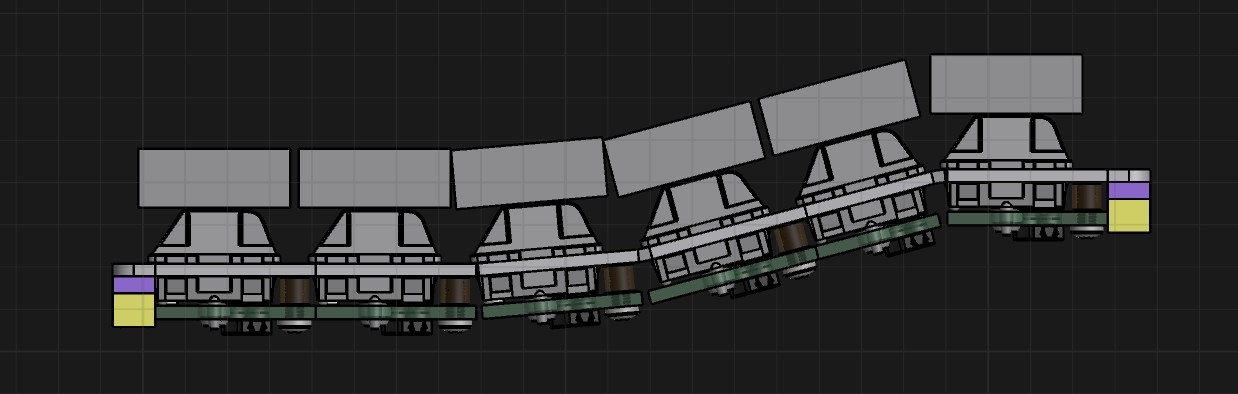
This is the key layout for version 49. The overall height has been lowered, and you can see that the angle of the F column has been changed to a plane, significantly reducing the height.
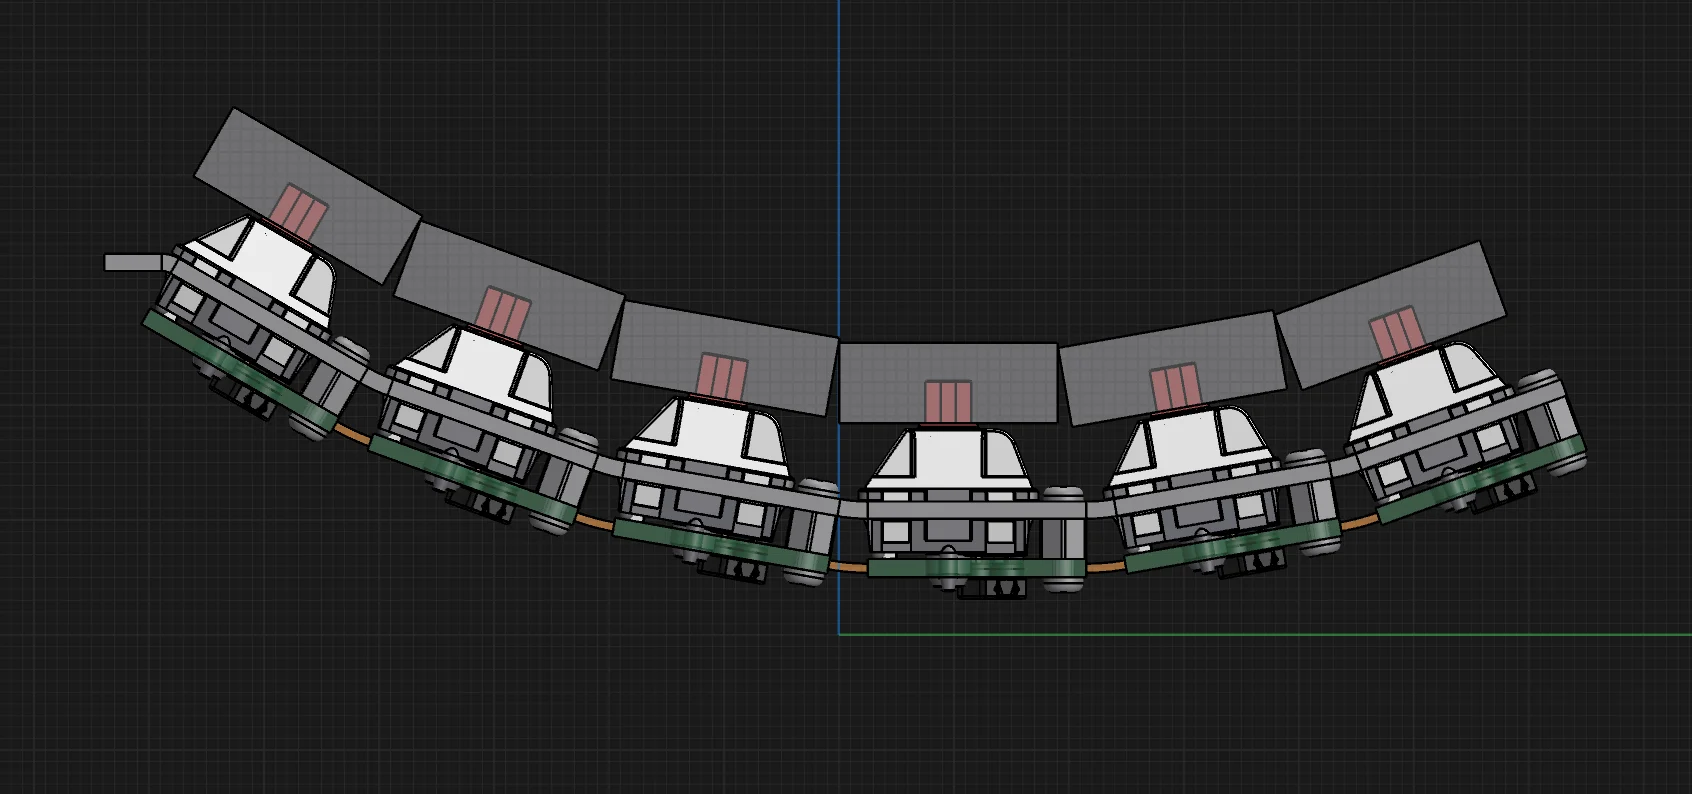
Although it's not exactly the same as the previous version (it was too much trouble to pull out and organize the render data...), I think you can clearly understand the difference by looking at the two key layouts. The angle between each key has also been reduced considerably, which is another point where considerations about keycap design have come into play. I'll probably talk about that in the next post.
As a result, the distance your fingers travel has increased by about 3.4mm, making it slightly harder to press the center of the number keys. This was intended to be solved by changing the position of the palm when pressing the keyboard's F key as a neutral position. To conclude, the palm rest has been raised slightly, and when you place your hand on the keyboard palm rest, the height of your hand is about 6mm higher than before. I think you can refer to the image below for this.
The palm rest had to be removed for portability... but the palm rest is necessary.
Integrating the palm rest realistically makes the keyboard too large. The maximum size I envisioned for this keyboard was that when the two keyboards were placed side by side, the height from the bottom should not exceed that of a 14-inch MacBook Pro. This unfounded stubbornness stems from the assumption that if you carry the keyboard with your laptop, the combined area of the keyboard and laptop would exceed what I consider "portable".
I used to carry a keyboard with my laptop, and as a result, I gradually switched to smaller keyboards. As a result, I have quite a bit of experience using 60% keyboards, and I believe this is one of the causes of the pain I experience when using keyboards now. Since I've become dependent on a palm rest for keyboard use, I decided to find another way to design it instead of omitting it altogether. The result of that design is as follows.
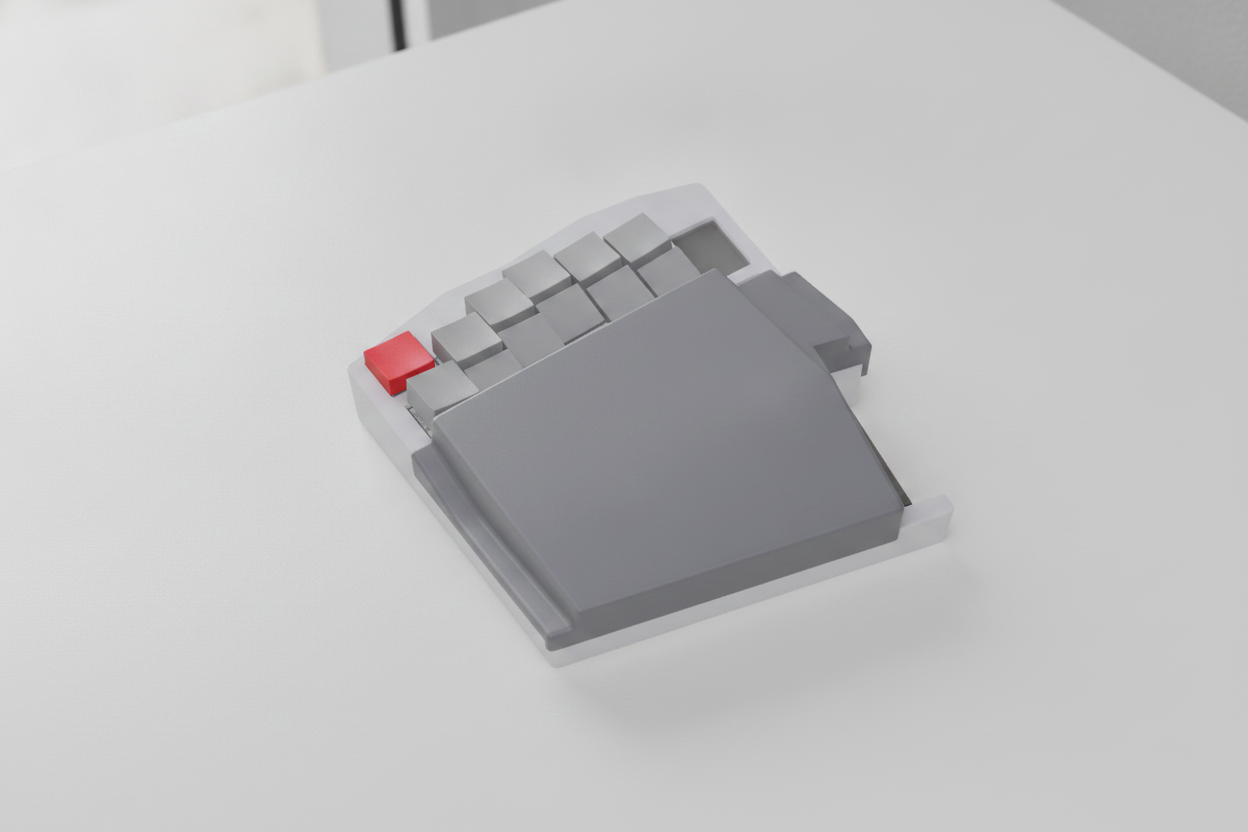
The design result is... making the palm rest a keyboard cover. When moving, the palm rest covers the keyboard, and the overall volume doesn't increase significantly.
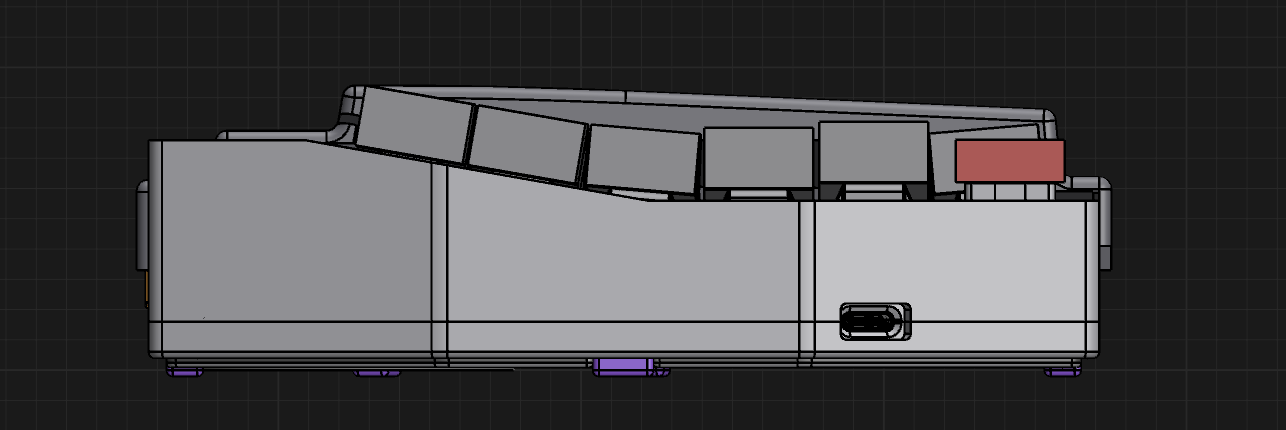
From the front, you can see that there is little difference in height between the F keys at the top and the palm rest cover. The overall height is kept below 4.5cm.
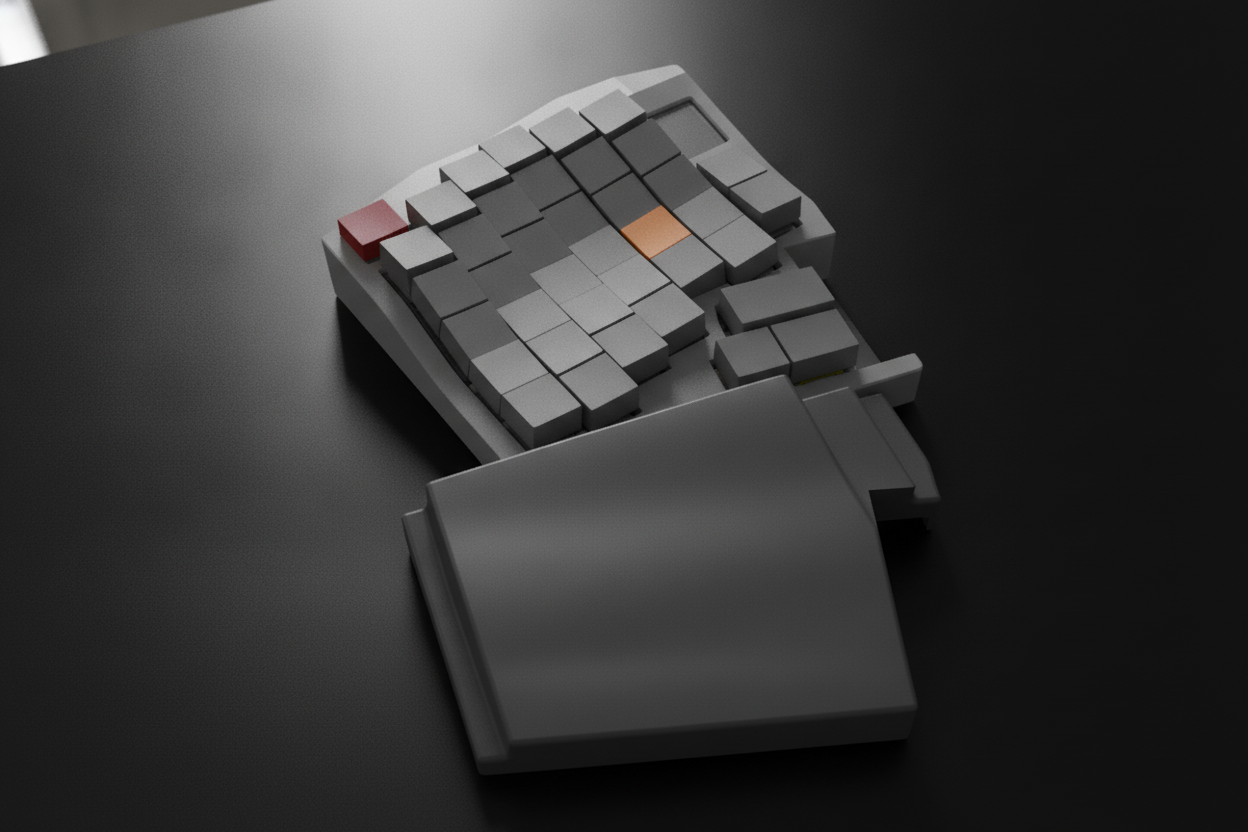
When in use, the palm rest connects to the bottom groove of the keyboard and the top groove of the palm rest. At this point, the surface of the palm rest slopes downward so as not to interfere with the movement of the thumbs. The palm rest will be made of plastic - probably ABS - and will be at least 4mm thick, so it shouldn't bend easily (although if you hit it with a shotgun, it might break... but then you'd have to make it out of aluminum).
I felt like I had "solved it!" when I came up with and drew this design, but I'm still thinking about modifications to further increase its stability. However, I am confident that this approach can secure both practical usability and portability.
Battery? ... LEDs are sacrificed when using the battery.
If you've had the experience of using a wireless keyboard with batteries, you'll know that the battery lasts quite a long time. Typical keyboards use very little power even when wireless. Bluetooth uses very little, and 2.4G uses relatively more, but still very little.
However, in the world of keyboards, LEDs are battery-devouring monsters. Especially with keyboards where each key has its own LED and rainbow colors flash back and forth like lightning, that shimmer is essentially an indicator that the battery is draining. There are two ways to solve this.
Put in a huge battery.
Give up on LEDs.
Use LEDs in a limited way.
What I chose was option 3. The function that LEDs themselves have is basically aesthetic, but as with the Golve80, there are cases where they're used as an indicator function showing battery status or feature status. The keyboards I'm designing have a separate LCD, so there's no need to consider using the LED for indicator functions as well, but even so, making it possible to use the LEDs at least while power is being supplied via a wired connection isn't difficult, it adds to the product's appeal, and I think having them function as indicators at least in cases like layer usage isn't a bad design.
So, the version 49 design also includes an LED for each key. Simply put, when running on the internal battery, the timing of LED operation is limited to the following cases.
When first powering on.
When pressing a layer key, only the keys assigned to that layer light up in their designated color for 2 seconds.
Of course, when connected via wire, it could light up flashily. But personally, I really dislike LEDs flashing, and I don't think it helps usability in any way. So, I've decided to compromise at this level.
How much did the battery shrink by? ... A lot?
The version 48 design, which had a palm rest, was designed to house two 21700 batteries on each side. That means the maximum capacity was 10,000mAh. With that, even going wild with LEDs, it had enough capacity to last a week. But the battery in version 49 is 450mAh. Yes. That's roughly 1/22 of the level. It's the maximum size that fits into the space squeezed out within the internal housing. It's mounted directly on top of the mainboard.
However, calculations show that if you don't use the LEDs at all with this battery, there should be no problem with 20 hours of continuous use even accounting for the LCD and thumb module. Of course, if you throw 2.4G into the mix, that's around 15 hours. If you use it 8 hours a day, that would be about 3 to 2 days.
Of course, there's a problem that needs to be solved here, so I've decided to attach the battery pack externally. Of course, there are many conditions when attaching it externally too. What to use as the connector, how to secure it... and so on. Here's the conclusion I've reached.
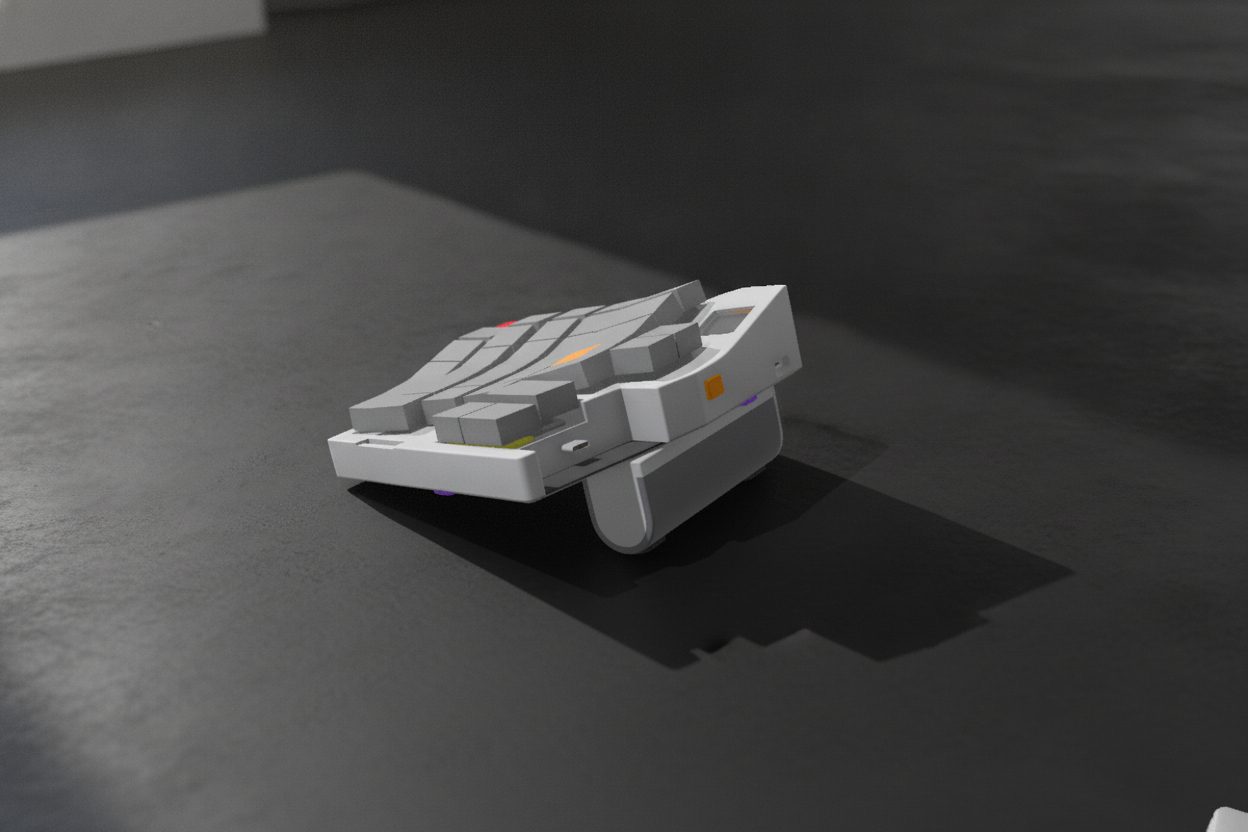
A single 21700 battery attaches to each side. It attaches to the bottom via magnet. (The bottom plate has a structure where a steel plate covers the entire surface, which is also a design change made to reduce overall weight and complexity.) Power supply from the battery to the main unit connects to the main unit via a USB-C cable. And, since it's attached to the bottom anyway, it also functions as tenting legs. At this point, the keyboard has a 15-degree angle. Of course, since it can be attached anywhere on the bottom via magnet, some degree of angle adjustment is possible, but I think if it exceeds 20 degrees, typing stability would suffer.
Of course, since the battery is external anyway, it can naturally also be used as a separate external battery pack. You should be able to charge anything with it. At 5000mAh, that's enough to charge a modern smartphone from 0-100% once. Of course, you can also charge it while simultaneously connecting to a PC via wire. For this, the battery also has 2 USB-C ports.
In other words, you don't necessarily need this specific battery — you could also use it while charging with a portable battery you already carry around. But in that case, you couldn't charge the battery while also connecting to the PC via wire like this. But then again, there's no need to connect to the PC via wire while also connecting the battery for wireless use. If you're going to do that, you might as well just connect to the PC via wire, in which case even the small internal battery would work fine while diligently charging.Well, even attaching the external battery, the battery capacity is still cut in half compared to the previous version 48, but I've concluded that this is a reasonably sensible solution.
Ah, using a palm rest together while tenting is difficult. After using several split-tenting keyboards, I've concluded that in order to be able to use a palm rest while tenting at the same time, a separate palm rest is unavoidably essential. This is the conclusion I reached after attaching a tenting kit to the UHK.
Modules.
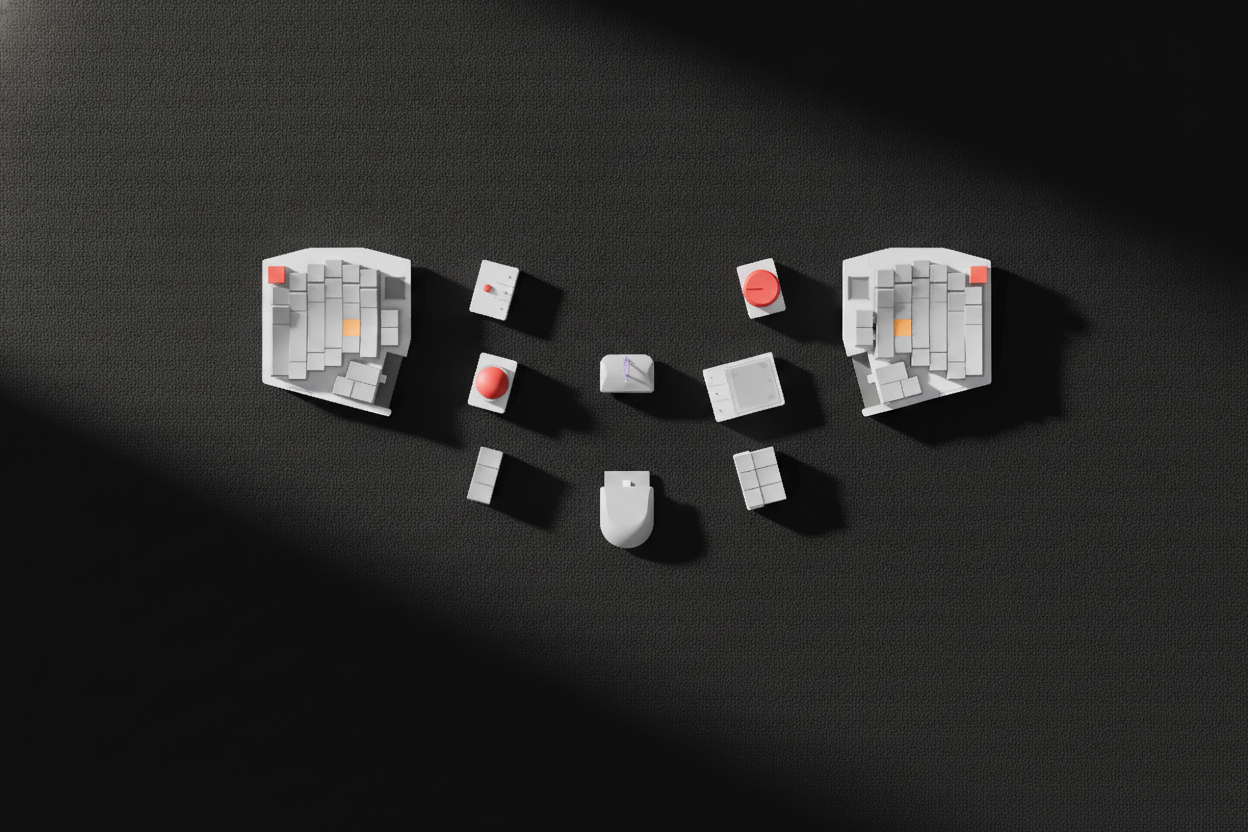
There's a bit left to organize regarding the thumb modules, and the list is as follows. In the image above, the order goes from bottom-left upward, then from top-right downward.
3-key keyboard module. - 3 CHERRY MX compatible keys are provided. (2 are included standard with the keyboard)
34mm trackball module. - This is a trackball that includes a 34mm trackball and 4 side buttons.
TrackPoint module. - This is a TrackPoint that includes a SPRINTEK TrackPoint module and 3 buttons.
Wheel module. - This is a wheel module that includes a bearing-equipped 40mm finger wheel (a wheel you place your finger on and rotate with a single finger) and 3 side buttons.
Trackpad module. - This is a trackpad module that includes an AZOTEQ or proprietary trackpad and 3 buttons. It's quite thick because we designed it to work smoothly when attached to the keyboard. However, I think it won't be very popular since most people would just use the laptop's trackpad when using it alongside a laptop.
6-key keyboard module. - 6 CHERRY MX compatible keys are provided.
These modules are set to work whether inserted on the left or right. For those that handle mouse movement, there are complex points in the design and programming because the orientation needs to be configured separately depending on where they are inserted.
And these modules should be able to function as a wired device when connected to a PC etc. via USB-C cable, and can also be used in combination with a separately designed wireless mouse module. This part corresponds to 2 modules in the center of the image. The wireless module can basically function as a mouse. Of the two modules in the center, the lower one is the base of the wireless module. This base contains a 500mAh battery, and modules can be combined with it. It is basically provided as a set with the mouse-enabled module above in the center.
Mouse head module. Provides 4 buttons and a scroll wheel.
Wireless base module. It has its own mouse sensor, so it provides mouse functionality in combination with any module. If the combined module is one for controlling mouse movement such as a trackball, trackpoint, or trackpad, you can set the operation priority. When the mouse takes priority, that module can be assigned a separate function, and I'm trying to make it possible to use it simultaneously with the mouse. This part requires a bit more explanation, but separately from this project, I'm working on a mouse design with an integrated trackball. This came from a long-held idea of wanting to create a mouse that allows users with disabilities to play FPS games. I'll tell you more about this separately later.
In any case, with these modules configured like this, the goal is to basically provide these modules as options. I tried to create some aesthetic unity to do this, but... I gave up. It seems no matter how I tried to implement it, minimizing volume and maintainability didn't work out.
Today's conclusion. Moving to the next step.
The reason I'm posting this is because your feedback helps me quite, very, very much, extremely, tremendously. After a long time has passed since the intense activity of the old community days, I'm currently going through a prolonged lull in community engagement, but still, others' interest in what I'm interested in is precious to me.
Next time I'll probably talk about organizing the BOM and then coming up with a disappointing estimated pricing (?) or something like that. Since this isn't something that will come out cheap no matter what, I'm thinking of first trying to make a minimum viable version that I and those around me can use. Of course it will be all manual labor, so I have absolutely no confidence in producing quantities, and first I need to start by gathering parts. Still, I need to produce quite a few PCBs, and most of them are FPCBs, and on top of that, with the parts selection for IFIXIT 10 that I mentioned above, the unit prices of each component are already daunting. First I need to sort out the BOM and then start gathering the necessary components.
In any case, thank you for your interest. And I'm even more grateful for those who read this long post all the way through.
I'll try to bring you the next update soon.
+ I saw there was a poll feature, so I added one. If it's not too much trouble for you, please take a moment to consider it. I'd be even more grateful.